Monday, March 14, 2011

Compact Mirror


I made this as a gift for Liam's teacher :) I experimented a bit and made my own mold for the flowers. I followed Donna Kato's tutorial found in her book Creative Surface Techniques. The look that I wanted to achieve was "Bas Relief" but obviously I didn't achieve it!! hahaha I think i made the flowers too thick! :) I enjoyed making the mold though. I plan to make more molds soon!

Here are pics of the project..

I made a clay flower first and after baking I pressed scrap clay (that I passed through the pasta machine using the thickest setting and then folded it into two) onto the flower to make this..
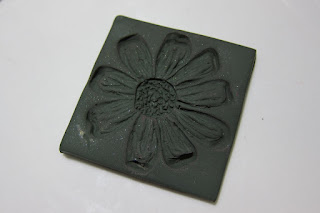
:) It's a very nice technique! Now I can use this mold over and over again. So many designs that I have in mind..hopefully I can make some more soon..

Here's the mirror..where I used the flower mold..

I think I should have used my matte varnish instead of the glossy one.:(


Last Saturday, I got these!!! (thanks so so so much to hubby for going with me!)

Steampunk push molds! so cool! I saw these at Lisa Pavelka's blog! I wished and hoped that some online shop will purchase them..and I'm really so happy that Beadlady Craft Cafe are selling it! I can't wait to try them. I love the details on each mold!


Silicon for making detailed push molds. I have to use this soon before the expiry date:) I'm just choosing what charms and cameos to use. I'm also hoping that I'll get the mixing right!

Saturday also was a picnic day for us. Liam was the one who asked us to have the instant picnic! He enjoyed it a lot and didn't want it to end! I think we're going to have more picnics this summer vacation! I love this pic! Next time Daddy should be infront of the camera and not behind it. hahaha:)

It's going to be a very busy week..Liam's "Moving Up" program this saturday! I can't wait to see him in his pig costume! haha:)

Have a great week everyone!

Friday, March 4, 2011

Mother and Child


Of all the designs and projects that I made..this is my Favorite!!!:)
I also hope that my Mama will love it when she sees it tom!
Here are more pics..


Before I put it inside the box and frame:)

Framed!!:)

Wrapped and ready to be given to my mom.

Happy Birthday Mama!! Thanks for everything! We Love you!


Back to the Shadow box..


I was supposed to share with you my progress in making the shadow box..but i didn't have the time to blog right away. :(

On tuesday, I covered the inside of the box with clay. I just didn't want to paint it because I want the background to have a nice texture. It would also be easier for me to attach the clay Mother Mary, Jesus and flowers to it. It looked like this..

I used stamps to put texture on the clay. From blah to.....
...Wow! hahaha:) Look how Pearl Ex and Beadlady Sparklers can do!!! They can really add life and dimension! :)

I just have to check how it will look like with the frame..so far....the colors matched! yey!

I forgot to take pics of it while I make the images and flowers:( Anyway, I took this pic after i finished baking it. I removed the clay from the box and colored the sides with acrylic paint.

After the sides dried..it was time to put the box together again and glue everything!

Now..time to show you what i made! Next post pls...

Pasta Machine :)

I'm loving my new pasta machine!! I really have to retire my old one that i have been using for the past 2 years. The body of the old pasta machine was already bending to the left and some screws were coming loose already. Even if I tighten over and over again..after a few days of using it..they'll come loose again. I really have to let it rest and buy a new one.

I've been eyeing this pasta machine with a non stick roller by Makin's . Luckily, I came across the site of Kat, a distributor of Makin's clay here in the Philippines. I ordered at once..unfortunately I was too late to avail the discount hehe:) It was a bit expensive compared to ordinary pasta machines, but it was really worth buying.

Worth it because of the non stick rollers..so far any brand of clay that I pass through the rollers, doesn't stick! Another reason why buying it is worth it.. is because you have the option to buy the electric motor that you can attach to the pasta machine and Voila! No more manual labor! hehe I still don't have the money to buy the motor but it's definitely in my wish list! :)

Here's how it looks like:


I love these non-stick rollers! :)

I'm going to be on a blog roll today! Next post..back to the shadow box..i'm so excited to show you what I made! :)

Tuesday, March 1, 2011

Shadow Box

Here's what I finished so far..not so much clay work yet just the box..very slow progress and I definitely need to finish this week!!

the box...I used illustration board bought at national bookstore. I chose the board with a colored white back..usually used for painting and sketching.


Tried it if it would fit the frame. Yey it fits!:) i bought the frame at Japan home center..this store rocks!! Lots of useful things that you can buy at a very cheap price...Php66 or Php88?!! hehe


This is how the back of the box looks like. I'm still not sure how I will glue it to the frame! I'm planning to use a thick masking tape and then paint it silver or gold. Still not sure but I'm hoping that I can come up with a good solution.


I started to make flowers already. I hope I can come up with more flowers soon!:)

I'm really hoping to finish this project this week! Wish me LUCK!